Vermicompost: an agroecological miracle!
Are you looking for an organic soil improver that will add beneficial bacteria, nematodes, fungi and protozoa to your soil, while increasing the bioavailability of certain nutrients? All this without having to blow your budget on sophisticated, laboratory-designed, expensive products? Would you also like to give a second life to your table scraps, expired fruit and vegetables, peelings and other bio-waste such as cardboard, paper, sawdust or dead leaves, in the shortest possible circuit, without odors or hassle? Read on to discover a wonderful process that’s easy to maintain, economical and highly enriching in terms of soil fertility and bio-resilience: vermicomposting. Making a vermicompost, u a simple solution that can be used in the vegetable garden, apartment or classroom.
What kind of worms should be used in vermicompost?
Although there are an impressive 3,000 to 6,000 different species of worms, depending on how they are classified and categorized, when it comes to composting, i.e. the transformation of dead organic matter, there are generally around 15 species of interest to us.
The most commonly used, and adapted to the Nordic as well as many other climates, is the Eisenia Fetida. It belongs to the annelid family, since its body is made up of rings. It breathes through its skin, so has no specific organs for this purpose, and its whole body also constitutes its digestive system; it can consume half its weight in food every day. Like us, it has taste buds and therefore food preferences. All the organic matter it consumes mixes with the enzymes present in its digestive system. It will add protozoa, nematodes, bacterial and fungal life, before releasing it all through its defection into hummus.

Eisenia Fetida or « manure worms
What is the purpose of vermicompost?
When present directly in garden or forest soil, they improve the soil’s capacity to breathe and store water, and facilitate the circulation of micro-organisms and the exchange of nutrients between the various players in the soil ecosystem, in its different layers.
In our homes and gardens, it has 2 main roles:
- Getting rid of green waste
- Producing fertilizer
As an agent for transforming organic matter, the product of its work has been shown to attract and retain pollinating bees earlier in the season and for a longer period when fed to plants as fertilizer.

How to make vermicompost?
There are many different methods or types of vermicomposters, both machined models of different sizes and levels of refinement and options – for example, models with multiple compartments that make harvesting easier, models that blend into the décor with an aesthetic that resembles a piece of wooden furniture or similar, ranging from 100 to 500 chf for the most luxurious models.
Fortunately, there are also many ways to make your own device, ranging from CHF 5 to 30 for basic models, up to CHF 60 to 90 (€90) for more sophisticated models.

Materials needed to build a vermicomposter :
- Built-in bins:
We’ll look at the number and dimensions later. - A tool for drilling ventilation holes:
Ideally an electric drill for quick and easy work, but if it’s difficult for you to access, heating a nail or needle on a stove or using a lighter can also be a back-up option that will get the job done, with more effort and patience. - A good quantity of carbonaceous material:
For every 250ml by volume of table scraps – nitrogen-rich material – that you supply to your worms, you need to supply them with double the volume, in this case 500ml, of carbon or brown material from trees (cardboard, unbleached paper, sawdust, shredded branches, etc.).
The closed-bin vermicomposter:
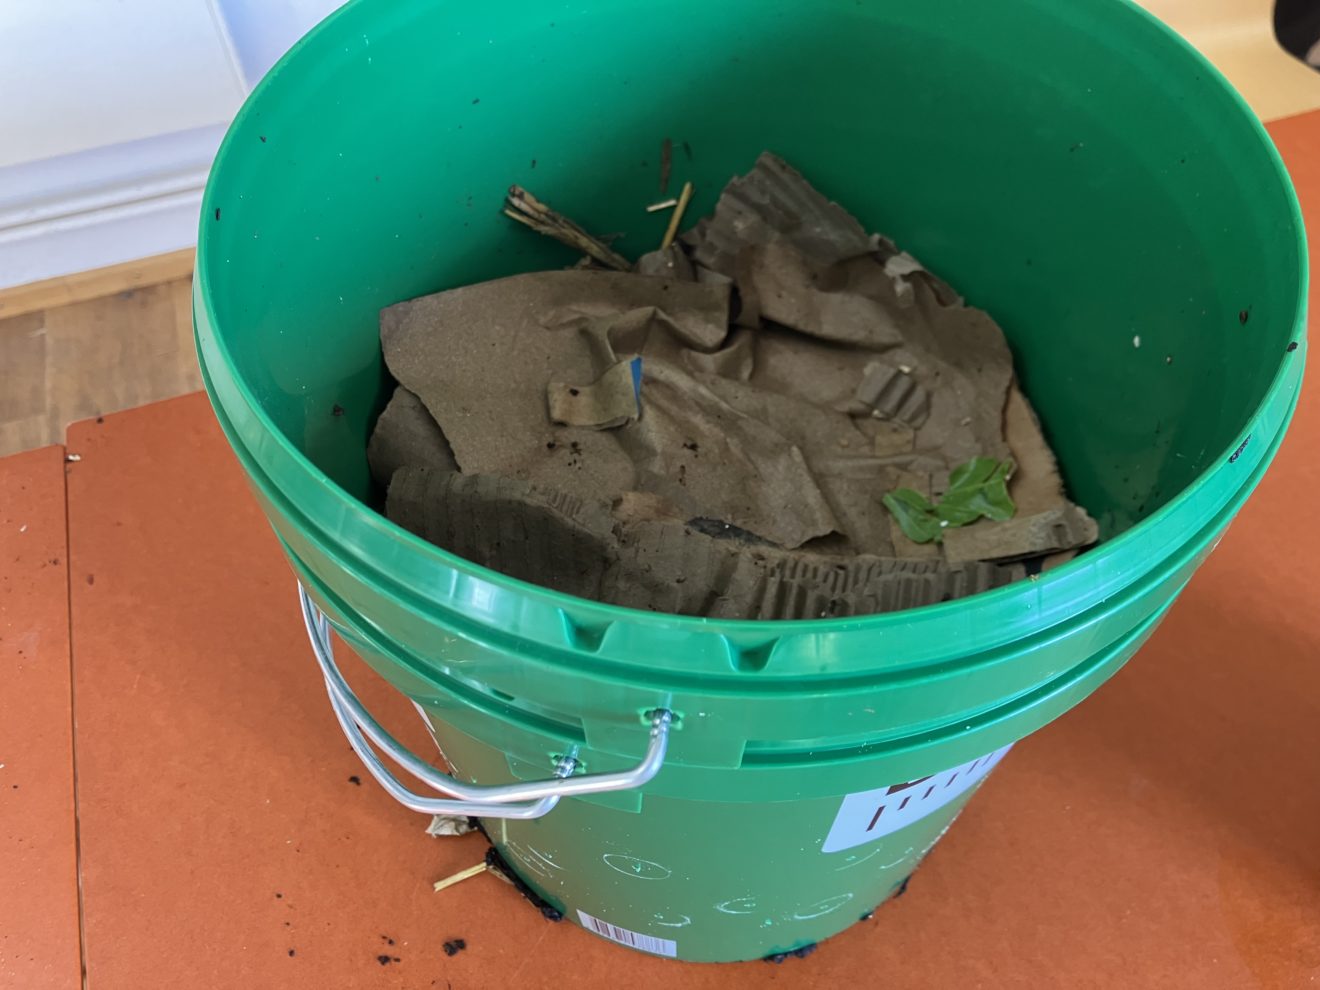
Perfect for the home, the least expensive (under CHF 10) of the various options. All you need to do is get your hands on a plastic container or preferably two of the same size, about 20-50L in volume, with a lid. Drill small 0.5-2mm holes in the lid, sides and bottom for emergency drainage. If you have two containers, make sure they fit into each other before drilling the holes in the sides simultaneously. Drill holes only in the bottom of one of the two containers; the other is for collecting excess moisture. You can also make do with just one container, and place it on a disposable aluminum rimmed baking dish to catch the excess water. The general idea is for it to be opaque, sufficiently aerated, and able to drain so as not to drown the worms in the event of excess water.
Please note that with this model, you cannot recover excess water or produce liquid fertilizer with this type of composter.
So you need to be careful about how much you feed your worms (and avoid feeding them leftover soup…).

The open-bin or tray composter:
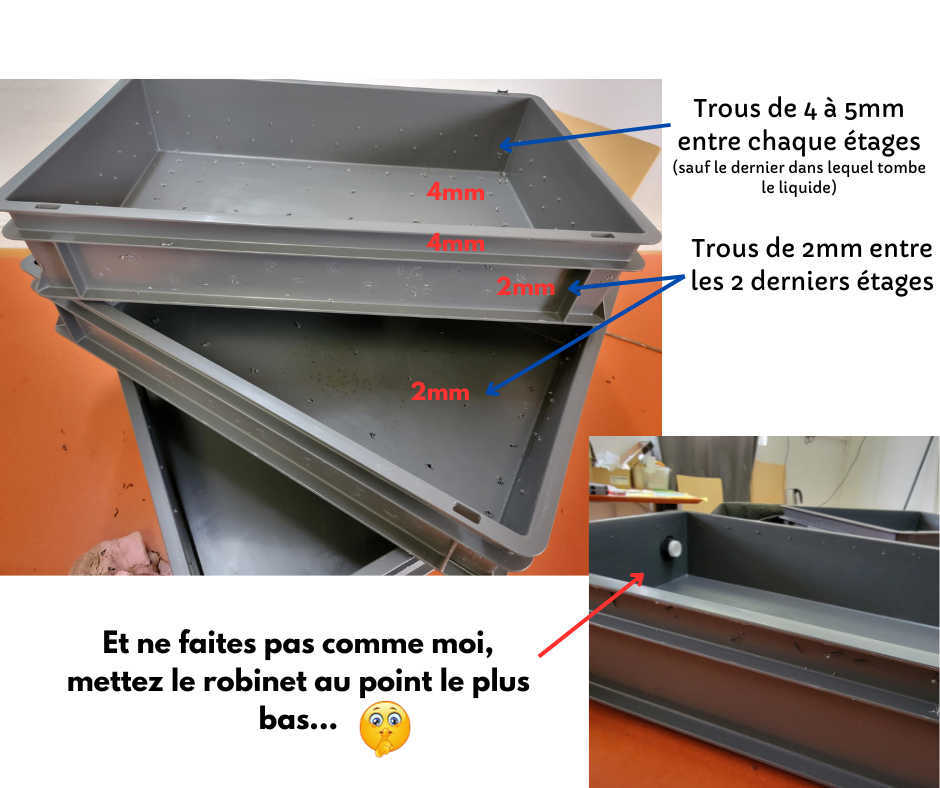
A little more demanding in terms of materials and labor, the open-bin composter’s principle is to incorporate more water and wet matter to create a surplus that will flow to the last bin, amassing nutrients and beneficial bacteria as it passes through the preceding bins, resulting in the creation of a rich liquid fertilizer several times a month or even weekly. Note that this liquid fertilizer must be used within 2 to 48 hours of production, as the beneficial bacteria present in the liquid can quickly die off, and if the liquid remains inert for too long, without oxygen, it can even ferment and produce bacteria dangerous to your worms.


However, if used immediately, it has many benefits for your plants, balcony, garden or otherwise, although it is strongly recommended to dilute it 1:10. The other advantage of this type of composter is that humidity control is simpler; you saturate it with water and the excess, also known as leachate, potentially becomes liquid fertilizer, so you don’t have to worry as much about it and adjust it as you would with a closed bin – the first type of bin -. But beware: this liquid is very difficult to store. This type of composter also requires special attention to be paid to the bottom of the container/to the penultimate compartment where the drain is located, because the excessively compacted and moist material can prevent oxygen from circulating and create acid and anaerobic micro-climates that can make the leachate harmful/nuisible for plants and humans, or even upset the whole system if the problem persists.
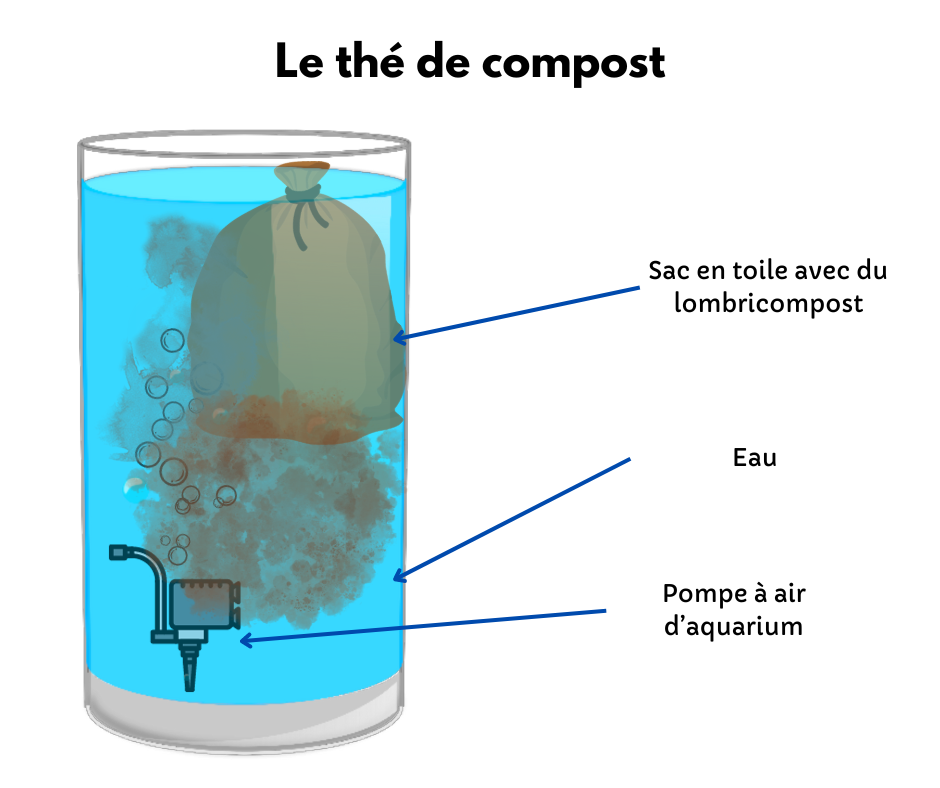
If you’d like to make a high-quality liquid fertilizer on demand, we recommend the following method: Compost Tea
Fill an old sock with the solid matter taken from the vermicompost, mix in a basin of water. And remember to dilute this juice for use on plants.

The worm tower :
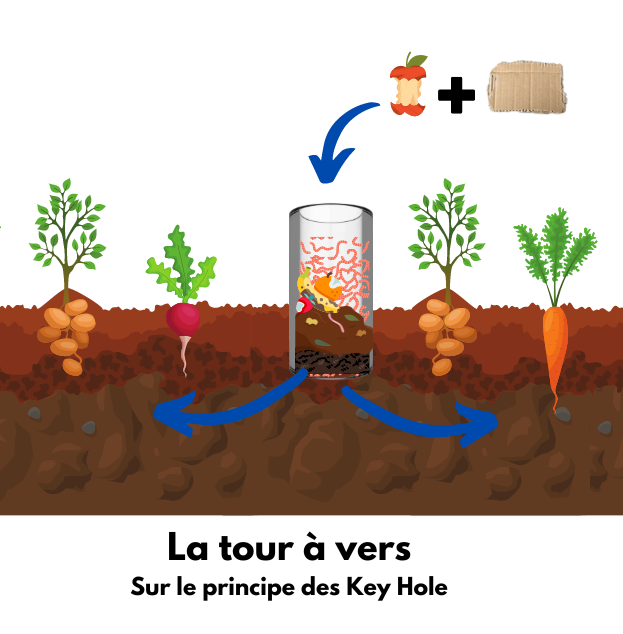
A bin of vermicompost placed directly in a hole in the ground, with circulation holes at the bottom so that the worms can move around and spread beneficial micro-organisms to the crops and soil around the « tower », allows for natural radiation, 2 to 3m in diameter, all around the device. The least maintenance-intensive of all types of vermicomposter, it is nevertheless limited in terms of its capacity to cover an area, and is vulnerable to potential predators of the local ecosystem, as well as to acute meteorological variations, whether in extreme heat or consecutive sub-zero cold. For the ventilation holes at the top of the container, it’s important to glue a very fine screen/net to prevent other insects from replacing or harming the worms, and to put a lock or heavy weight on the lid to prevent rodents or other small animals from feasting on the table scraps destined for your earthworms.

Direct vermicomposting:
Consists of depositing earthworms suitable for composting, in more or less appreciable quantities, directly in your vegetable garden, garden, orchard or in a container on a balcony. Can be used as a complement to of other methods, can increase the speed of circulation of micro and macro biological life within the soil. It promotes soil aeration and porosity, butEisenia Fetida, which tends to live on the surface of the soil, in the litter, can easily fall prey to various birds, rodents or reptiles, making you lose your investment with little benefit. It’s best to use this method sparingly, at a time and in an environment where the litter is thick and voluminous, to give them more places to hide.
How do you get worms for your vermicompost?
You can go and find agricultural composting areas yourself and try to capture them one by one, although this is a slow and uncertain, if not arduous, method.
You can also look for vermicomposters or farmers who raise worms or have a commercial or industrial-sized vermicomposter that could sell or give you some. A vermiculturist in the canton of Vaud who has the expertise and sells both turnkey vermicomposters, and the finished vermicompost product, and the worms themselves, with nearly 30 years’ experience. Their website https://lombritonus.ch/ (Gerber ETL Lombricompost).
There’s also a free worm-sharing platform founded in France, but which now has very active members in many of the world’s major cities on several continents. The https://plus2vers.com/fr/ platform, managed by the Les Boîtes Vertes association based in Rezéé, near Nantes, enables you to register and contact members directly, using an interactive map, to ask them for a donation of worms. We’ve used this very user-friendly platform ourselves to fill our educational worm composters, and can attest to its efficiency and to the friendliness and seriousness of its members.

Tips on how to feed them
More litter or carbon, less table scraps or nitrogen
There’s no risk or negative effect to providing your worms with lots of shredded or torn cardboard, sawdust, shredded branches, or any other dry carbonaceous material.
On the other hand, problems quickly arise when more food is given, in the sense of table scraps typically rich in nitrogen. Just as they are not specialists in breaking down proteins and/or carbohydrates. To prevent problems, remember that we always tend to give them too much table scraps. And never enough dry cellulose waste.
The worms consume and transform the leftovers with the help of the bacteria involved in their digestion.
Table scraps generally take 3 to 7 days to be sufficiently degraded by bacteria. Only then do the worms join in.
Moving floors
Therefore, the ideal method is to put the table scraps/nitrogenous waste in one half of the bin week 1, in the second week 2, and alternate, so that the initial heat-generating decomposition takes place in one half of the bin while the worms consume the already partially decomposed organic matter in the other. Nitrogenous waste should ALWAYS be covered with at least its volume, if not twice its volume, of shredded cardboard. In this way, you can prevent the appearance of undesirables such as fruit flies, which come to feast and lay their eggs.
After a move
Worms are generally quite disturbed, and can be very active in the first week after moving to a new environment: it creates a state of shock and destabilizes them. It’s therefore important to give very little, if any, food other than cardboard litter.

What worms do and don’t eat?
I like
As with all composts, the more variety you put into it, the higher the quality of the finished product. Thus, the variety and quantity of nutrients present in organic fertilizer will depend on the variety and quantity of nutrients provided through table scraps and other food supplied to the worms.
Worms generally love banana and mango peels, and most members of the cucurbit family (cucumbers, zucchinis, etc.). They also love carrot and salad peelings, and leftover melons.
I don’t like
Conversely, strictly avoid the garlic/onion/celery/rhubarb family, citrus fruits of all kinds and tomatoes, and in general, as few excessively acidic or fatty products as possible, and avoid all animal products to avoid complications and odours. Try to maintain a balance between nitrogenous matter of fibrous advantage, lettuce, cabbage, cucurbits, and table scraps of sweet/starchy advantage such as fruit or potatoes. Too much sugar or starch can potentially create fermentation or excess acidity, which can quickly lead to complications.
The potion!
there’s a solid mixture that helps worms gain volume and reproduce better, popularized by worm breeders and nicknamed « worm chow », which consists of approximately 1/3 ground eggshell, 1/3 ground organic oats, 1/3 corn flour, ideally organic if possible.

Harvesting solid compost?
There are two main ways to harvest the quality compost you’ve produced (without harvesting the worms along with it…).
- The first and simplest method, especially for single-bin indoor vermicomposters, is the garden sieve. Take a garbage bag or other container of sufficient size, a small bucket/shovel, a garden sieve, and sift your compost to extract the greens and large particles not transformed by them. This takes time, and has a stressful effect on the earthworms, which may take a few days to recover. Try to retain 5-15% of the compost to keep the bacterial life in the composter and reduce the shock to the worms.
- The second method is to use their sun aversion to our advantage. This method is interesting for outdoor or larger-volume installations. The technique consists in uncovering about two-thirds of the compost bin, and adding new food attractive to them in the third that is still covered. The uncovered two-thirds is exposed to the sun, so it’s repellent to them, and possibly drier; the other side is watered and contains food, so naturally there will be a migration towards this end of the container. Faster, less time-consuming method, especially for large volumes, but requires stable access to sunlight and a secure outdoor space to proceed. And you won’t be able to recover 90% of your finished compost or remove 90% of the earthworms from the part you do recover.
Reminder: Although worm compost is one of the best fertilizers, it obeys the laws of physics. Don’t imagine you can feed 200m2 with just a few grams of this product. Count on one bucket of compost per plant to obtain significant results.

Ventilation: a key factor
Ventilation holes, not only on the lid, but also on the sides of the bin or each bin compartment, greatly reduce the risk of complications arising from the development of anaerobic bacteria. Similarly, start your bin with a large quantity of bedding in the form of finely shredded cardboard, and constantly add 2 times the volume of this bedding for each volume of table scraps.
« Toss regularly with a small fork to « stir » the bottom of the compost bin, decompacting the compost and homogenizing moisture throughout. This will encourage the development of healthy bacteria and the rapid decomposition of waste into compost.
If the compost has a pleasant woody/mushy/earthy smell, without any bitterness, most of the time it’s a sign that your compost is aerobic and therefore a good compost. If, on the other hand, it smells of vinegar or sulphur, this is usually a warning signal; any unpleasant odour is almost always a major sign that something is wrong and needs to be investigated and adjusted as quickly as possible.
Compost tea and leachate are TWO different THINGS !
Worm tea, or vermicompost tea, is when a liquid fertilizer is prepared from the finished, stable solid compost from the vermicompost. The juice is extracted using a canvas bag similar to a tea bag, but larger in size. You can add molasses and/or seaweed powder to feed the bacteria you wish to inoculate and see proliferate, and an aquarium pump to keep the « tea » oxygenated, for 12 to 48 hours. Ideally, this juice should be used quickly to maximize its benefits (1 to 2 hours after the pump has stopped, the sooner the better).
Leachate, or excess liquid, is the liquid that generally collects in the last bin, at the bottom of a multi-bin system. It’s the excess moisture from the vermicomposter that’s carried by gravity to the bottom of the container/system. This excess can be beneficial if certain precautions are taken, but it also entails risks. (Personally, we don’t use leachate).

Use leachate to minimize risks
Leachate, according to its advocates, is very rich in macro- and micro-nutrients and can give good results on various plants. Although it carries a number of risks, by taking the following precautions, we can minimize these and obtain more or less appreciable benefits most of the time.
Dilute to a minimum ratio of 1:20 water/leachate, e.g. 100ml leachate to 2L water. Before mixing, make sure there is no unpleasant/acidic smell or viscous/mucus-like substance in the watering can. Do not store leachate! .
Regularly clean drain holes with water or a needle, for example. The aim is to prevent the liquid from being contaminated by anaerobic bacteria accumulating around a partially or mostly blocked drain.
If you wish to use it, collect the excess liquid frequently – at least twice, ideally three times a week. Once again, the aim is to minimize the risk of proliferation of anaerobic bacteria.
Drill ventilation holes in the side walls, at the top, of the tank containing the excess liquid, to promote oxygenation, for the same purpose as above.
If you have the equipment, time and expertise, you can make compost tea from this liquid by diluting it, providing food for the bacteria and keeping it oxygenated by an air pump or rock or other mechanism.
Hardware: beyond the basics, what’s really useful
To separate the resulting amendment from your biowaste, a garden sieve works well.
To regulate the PH of organic matter and prevent excess acidity, a deacidifier, generally rich in calcium – to bring up a ph that’s too acidic – in particular, ground eggshells or ground oyster shells, or dolomitic lime (the latter to be used with MUCH moderation, as a last resort, in severe cases, when you can’t find the first two).
In the same vein, to accurately assess the state of decomposing organic matter in your vermicomposter, a soil PH, humidity and temperature indicator tool can be used in the bin to take measurements and make sure things stay within the right parameters: humidity of 62 to 80%, temperature of 12 to 22 degrees Celsius, and ph of 6.8 to 7.2, as close to neutral as possible, are the ideal conditions for optimizing the yield and health of your earthworms.

5 Tips to avoid problems with your vermicompost
- Firstly, manual aeration of the composter, i.e., decompacting by hand or with a small rake, any clumps that are too massive in the bin.
- Remove food that the earthworms have refused to eat after a certain period of time (plus or minus 3 weeks).
- Be sure to decompact the lower corners of the tank, as this is generally where it clumps together and can create a medium-term oxygen shortage.
- You also need to stir the material, bringing the bottom up and vice versa, a technique known as « turning », while taking care to keep table scraps covered with carbon. Do this about once a week. This promotes air circulation and the homogenization of humidity throughout the system.
- Take into account the water content of the household waste you put into the vermicomposter. If a bin is relatively dry, but you introduce a whole cucumber and 3 pieces of melon, for example, it’s highly likely that these foods alone will be enough to rehydrate the bin. Adding water at the same time can create excess water, which is detrimental to the health of your earthworms. Conversely, if you only have water-rich table scraps/food to provide them with, and the compost is already quite moist, consider also adding an extra amount of dry carbon to compensate for the added moisture.
Solutions to the most common problems
Most common problems, such as fruit flies or black soldier flies, or red moths that infiltrate, are linked to excess humidity and/or acidity. Stop feeding them for a week or two, add the calcium-based deacidifier, add plenty of dry carbon and avoid watering or moistening. This should solve a good percentage of potential problems. If there are ants, it’s often for the same reasons, except that ants survive better and are more attracted to dry areas and carbohydrate-rich plants simultaneously. Remove any remaining fruit and moisten further. In the case of midges, in addition to the above procedure, you can place a small jar of apple vinegar on top of your tray, which acts as a natural trap for them.
In conclusion
Vermicomposting is a unique way of adding value to organic waste to improve the soil and humus of your soil crops or even potted plants on your balcony. It’s the ideal way to produce natural fertilizer at low cost, and a low-tech way of doing it. To get closer to the zero-waste ideal, the first step is to significantly reduce the volume of food waste. This is a vast and diverse art and practice, and it would be difficult to cover all its aspects in a single article.
With the help of this body of theoretical and practical knowledge, accumulated from research and experience passed on by vermicompost growers, you now have all the knowledge you need to get started and help your plants, wherever they may be, benefit from the fantastic soil improver that is vermicompost.
The practice of vermicomposting allows for a lot of error and room for manoeuvre, so don’t be intimidated or discouraged by all this information, we encourage you to get out there and experiment; your plants will thank you soon enough!
To find out more about vermicomposting
For sources in English, use Google trad (select a sentence, right-click=> translate => translate all text)
Scientific study on the benefits of vermicompost for pollinating bees : https://www.hindawi.com/journals/psyche/2012/581458/
Documentary/Video tutorial on vermicompost (French) : https://www.youtube.com/watch?v=8x2bSWQYh4g
On the ideal moisture content of vermicompost : https://link.springer.com/article/10.1007/BF00260595
More detailed format by French earthworm expert Marcel Bouchet (French video) :
https://www.youtube.com/watch?v=wuuOhl606dA&list=PLoeixEdGHN473u-JalAbjaa09tCANRcos&index=4&t=3805s
Short VOSTFR video on waste reduction :
https://www.youtube.com/watch?v=V8miLevRI_o
Study on the contribution of earthworms to global agricultural crop production :
https://www.nature.com/articles/s41467-023-41286-7
First article written by Vincent Desrochers, who is doing his internship with us in preparation for his entry into HEPIA. Bravo to him for his precise research work!

